
Why Your Circular Saw Keeps Blowing Out Plywood Edges
You measure twice, clamp your straightedge down, and make what feels like a careful cut. Then you flip the panel over and find the face veneer completely blown out along the cut line. Splintered, ragged, unusable.
Plywood tear-out from a circular saw is one of the most frustrating problems in a garage workshop because it wastes material and ruins projects that were going well up to that point. The good news is that tear-out is not random. It has specific causes, and each one has a practical fix that works without specialty equipment.
What Actually Causes Plywood Tear-Out?
Plywood tear-out happens when the saw blade exits the wood on the face veneer side, pulling fibers upward and splintering the surface instead of slicing through cleanly. The veneer layers on plywood are thin, and when a blade tooth lifts rather than cuts, the surface cracks ahead of the tooth path.
There are four main causes that account for almost every tear-out problem in a home workshop.
The Blade Is Cutting in the Wrong Direction
A standard circular saw blade cuts on the upstroke. The teeth enter from the bottom of the panel and exit through the top face. This means the good face of your plywood needs to face down when cutting with a circular saw, not up.
Most beginners place the plywood good-side-up because that feels natural. That single mistake creates tear-out on the face you actually care about on almost every cut.
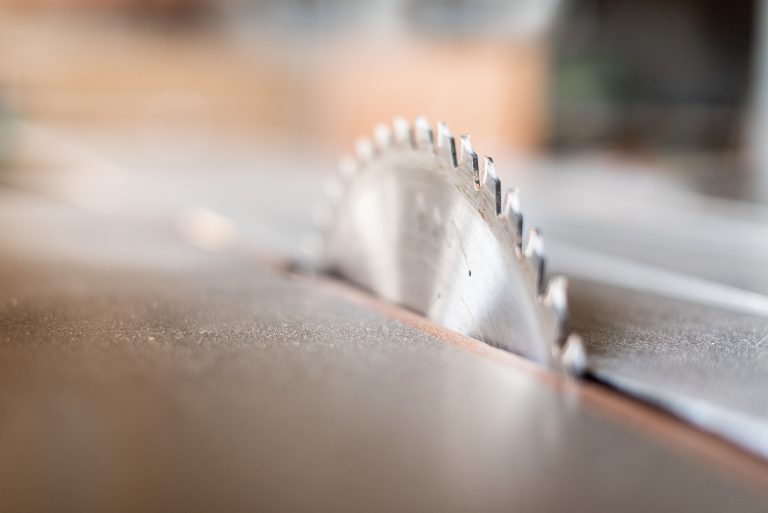
The Blade Has Too Few Teeth
A framing blade with 24 teeth cuts fast and rough. It works well for dimensional lumber but destroys plywood veneer. For clean plywood cuts, you need a blade with at least 40 teeth, and a 60-tooth carbide-tipped finish blade will give you significantly cleaner results on hardwood plywood and melamine panels.
More teeth means smaller bites per tooth, which means less fiber lifting at the cut line.
The Blade Is Set Too Deep
When the blade is set too deep below the panel surface, the cutting angle becomes more aggressive. The teeth hit the veneer at a steeper angle and are more likely to lift fibers instead of slicing them.
The correct blade depth for plywood is approximately 1/4 inch below the bottom face of the panel. Just enough of the blade clears the material. Nothing more.
The Panel Is Not Properly Supported
An unsupported panel flexes and vibrates as the blade passes through. That movement causes the veneer to crack ahead of the cut, especially near the end of the cut where the offcut piece begins to drop away under its own weight.
Cutting plywood flat on sawhorses with foam insulation board underneath is one of the most effective low-cost solutions for full panel cuts. The foam supports the entire panel, the offcut does not drop, and the blade cuts into the foam without damage.
How to Stop Plywood Tear-Out: Practical Fixes
Score the Cut Line First

Before making the full-depth cut, use a sharp utility knife to score along your cut line on the good face of the panel. A single clean score, just deep enough to sever the veneer fibers, creates a physical boundary the blade cannot blow past.
This works particularly well on hardwood plywood, veneer plywood, and any panel where the face quality matters for the finished project.
Apply Painter’s Tape Along the Cut Line
Painter’s tape applied directly over the cut line bonds the veneer fibers together and reduces tear-out on both faces. Mark your cut line on top of the tape.
This is a faster method than scoring for rough cuts and works well on shop-grade plywood where you need speed more than a perfectly clean edge. For finish-grade panels, scoring beats tape every time.
Use a Zero-Clearance Insert or Guide
If you are making repeated cuts on a table saw as well as a circular saw setup, a zero-clearance throat plate significantly reduces tear-out on the table saw by supporting the veneer right up to the blade teeth.
For circular saw work, a quality straightedge guide or track saw system gives you better control over blade wobble, which contributes to ragged edges even when blade direction and tooth count are correct.
Climb-Cut Approach for Thin Veneers
On very thin face veneers or delicate panels, some woodworkers make a shallow first pass moving in the opposite direction of normal feed, then complete the full cut in the normal direction. This climb-cut scores the surface before the final pass removes material.
This technique requires confidence with tool control and is better suited to intermediate woodworkers comfortable with their circular saw behavior.
Which Plywood Types Tear Out the Worst?
Not all sheet goods behave the same way under a circular saw blade.
Hardwood plywood with face veneers like maple, birch, and cherry tears out more aggressively than softwood plywood because the veneer layers are thinner and more brittle. MDF does not tear out the same way because it has no grain structure, but it chips and crumbles at the edge if the blade is dull.
Melamine-coated panels are among the most difficult to cut cleanly. The melamine surface is hard and brittle, and standard blades chip it badly. A triple-chip-grind blade designed specifically for melamine is the right tool for that material.
AC shop-grade plywood is more forgiving than furniture-grade hardwood plywood, which is why beginner projects benefit from starting with shop-grade material while developing cutting technique.
Does Blade Quality Actually Matter That Much?
Yes, significantly. A dull blade creates more tear-out regardless of tooth count because worn carbide tips drag and lift fibers instead of slicing through them. If a blade that previously gave clean cuts starts producing rough edges, dullness is usually the first thing to check before adjusting any other variable.
For a garage workshop doing regular plywood work, a quality 40-tooth or 60-tooth carbide blade is a reasonable investment that pays off in less sanding, fewer ruined panels, and cleaner glue surfaces when edge-jointing panels.
👉 Book a demo today and see how Woodshop Master helps your shop grow without limits.
FAQ: Plywood Tear-Out and Circular Saw Cuts
Why does my circular saw tear out even when I cut slowly? Feed rate is rarely the main variable. Blade tooth count, blade direction relative to the good face, and blade depth matter far more than cutting speed. Slowing down helps slightly but will not fix a 24-tooth framing blade cutting good-side-up.
Should I use a jigsaw instead of a circular saw to avoid tear-out? Jigsaws produce significant tear-out of their own because the blade cuts on the upstroke. A jigsaw with a reverse-tooth blade cuts on the downstroke and can produce cleaner results, but it is slower and less accurate for straight cuts than a properly set up circular saw.
What is the best blade for cutting birch plywood cleanly? A 60-tooth thin-kerf carbide blade designed for fine woodworking cuts is the most reliable choice for birch and other hardwood plywoods. Pair it with a scored cut line and good-face-down orientation for the cleanest results.
Can I sand out plywood tear-out after cutting? Minor tear-out on non-show surfaces can be sanded or filled. On finished faces, significant tear-out that breaks through the veneer layer usually cannot be fully repaired without visible evidence. Preventing tear-out is far more efficient than trying to fix it.
Why does tear-out get worse near the end of a cut? As the offcut piece reaches the end of the cut line, it begins to flex downward under gravity and vibrate slightly. That movement causes the veneer to crack just ahead of the blade. Proper panel support under the entire cut length prevents this.

