


How to Sharpen Chisels and Hand Planes So They Actually Cut Cleanly
You pick up the chisel, line it up on the joint, and push. Instead of slicing through the wood fibers, it crushes them. The edge skids, the corner tears, and what should have been a crisp paring cut turns into a ragged mess you now have to sand out. The tool is not broken. It came out of the box factory sharp, or close enough, and it has just never been sharpened since. Chisel and plane sharpening is the one maintenance task most beginner woodworkers skip, and it is the single biggest reason hand tools feel unpredictable instead of precise.
This guide covers the real process: flattening the back, working through a grit progression, setting a consistent honing angle, and testing the edge before you trust it on a project.
Why Sharpening Gets Skipped in the First Place
Most beginners assume a new tool stays sharp. It does not. Steel dulls with normal use, and a “sharp enough” edge is doing more damage over time than a properly maintained one, because a dull edge tears fibers instead of cutting them.
The other reason sharpening gets skipped is that it looks complicated from the outside. Stones, angles, jigs, grits. In practice, chisel and plane sharpening only requires three stages done in order: flatten, hone, polish. Once the sequence is set up correctly, a full sharpening session takes ten to fifteen minutes, about the same investment as setting up a simple workbench that actually holds work steady.
What Does a Dull Edge Actually Look Like?
A dull edge does not always look rounded to the naked eye. The real test is performance, not appearance. If a chisel will not shave the hair off your arm cleanly, or a plane iron tears the wood instead of curling a thin shaving off it, the edge needs attention regardless of how it looks under a light.
Flattening the Back: The Step Everyone Skips
Before any bevel work happens, the back of the chisel or plane iron has to be dead flat and polished to the same grit as the final bevel. A sharp bevel on top of an unflattened back will never produce a clean edge, because the two surfaces meet at a ragged line instead of a true point.
Sharpening chisels and planes starts here, not at the bevel.
How Do You Flatten a Chisel or Plane Iron Back?
Lay the back flat on your coarsest stone and rub it in small circles or figure-eight motions, checking periodically for a consistent scratch pattern across the entire width. Work through each grit until the previous scratch pattern disappears completely, then move up. This only needs to be done once per tool in most cases. After the initial flattening, touch-ups take seconds.
The Ruler Trick for Back Flattening
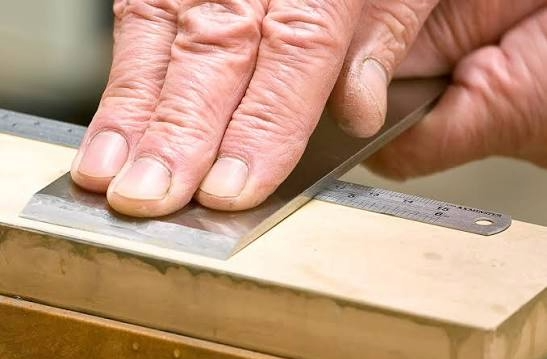
Full-width flattening on the coarsest grit can take a long time on an old or pitted tool. The ruler trick solves this: place a thin machinist’s ruler under the spine edge of the iron so only the last few millimeters near the cutting edge contact the stone. This creates a tiny back bevel that is invisible in use but cuts the flattening time dramatically, since you are only polishing a narrow strip instead of the entire back.
Grit Progression on Waterstones or Sandpaper
Honing chisels and plane irons follows a grit progression, moving from coarse to fine:
🪚 Coarse (220 to 400 grit): removes nicks, chips, and establishes the basic bevel
🪚 Medium (1,000 grit): refines the bevel and removes coarse scratches
🪚 Fine (4,000 to 6,000 grit): polishes the edge to a mirror finish
🪚 Optional finishing (8,000+ grit): produces the sharpest possible edge for fine paring work
Sandpaper on a flat surface (often called the “scary sharp” method) works through the same progression using adhesive-backed sheets from roughly 220 up to 2,000 grit, taped to a piece of glass or a granite tile. It costs less to start with than waterstones, though it wears out faster per session.
Do You Need to Buy Expensive Stones to Start?
No. A basic two-sided combination stone (1,000/4,000 grit) covers most chisel and hand plane sharpening needs for a beginner shop. Add a coarser stone later only if you are restoring old or damaged tools with chips and pitting.
Setting the Honing Angle
Most bench chisels and plane irons are ground at a primary bevel angle between 25 and 30 degrees, with a secondary micro-bevel added at 2 to 3 degrees steeper for durability. A honing guide holds the tool at a fixed angle so every stroke lands consistently, which matters more than the exact number chosen, the same kind of consistency that makes router basics predictable instead of risky.
Freehand sharpening is possible once the motion is memorized, but a honing guide removes the guesswork while you are still building the habit. Consistency across strokes matters more than hitting an exact angle number.
Why Does the Angle Even Matter?
A lower angle (around 25 degrees) produces a keener edge that cuts more easily but dulls faster. A higher angle (30 degrees or more) holds up longer under heavier use but takes slightly more force to push through the wood. Beginners get the most practical results starting at 25 degrees for paring chisels and 30 degrees for chisels and plane irons used for rougher stock removal.
Testing for Sharpness Before You Trust the Edge
A properly sharpened edge should pass three simple tests:
- The arm hair test: the edge shaves hair cleanly off your forearm without snagging or pulling
- The paper test: the edge slices through a sheet of printer paper held vertically, with no tearing
The end grain test: On a scrap of pine, the edge should pare a thin, translucent shaving off end grain without crushing the fibers, the same clean result you get when you read the grain direction before the cut.
If any of these tests fail, go back to the fine stone and take a few more light passes before moving to the project.
Maintaining the Edge Between Full Sharpening Sessions
Full sharpening chisels and planes sessions do not need to happen every time you pick up a tool. A quick strop on leather charged with honing compound, done for ten to fifteen seconds before or during a project, keeps an already-sharp edge performing at its peak far longer. This habit alone cuts down how often the full grit progression is needed.
👉 Book a demo today and see how Woodshop Master helps your shop grow without limits.
Frequently Asked Questions
How often should I sharpen my chisels and plane irons?
For regular use, a quick strop before each session and a full sharpening every few weeks of active work is typical. Heavy use on hardwoods or knotty stock shortens that interval.
Can I sharpen chisels without a honing guide?
Yes, freehand sharpening works once the angle and motion are practiced, but a honing guide produces more consistent results while you are learning chisel and plane sharpening fundamentals.
What is the difference between honing and sharpening?
Sharpening usually refers to the full process, including flattening and grinding a new bevel. Honing refers specifically to refining an existing edge on progressively finer stones without reshaping the bevel.
Do waterstones or sandpaper work better for beginners?
Waterstones cost more upfront but last longer per session. Sandpaper costs less to start but needs frequent sheet changes. Either method produces a genuinely sharp edge when the grit progression is followed correctly.
Why does my chisel edge chip out during use?
Chipping usually points to an angle that is too low for the material, a hidden nick from a previous impact, or steel that has not been properly hardened. Raising the secondary bevel angle by a couple of degrees often solves chronic chipping.
